Uniden BC-SGPS Kit

The BC-SGPS kit includes several parts:

  • GPS Receiver                           (small box)
  • Adapter Box                            (larger box)
  • SDS200 cable                         (Phone wire)
  • USB-Mini Cable                      (DB-9 to USB-Mini)
  • Handheld Scanner Cable        (DB-9 to Uniden Serial plug)
  • Mobile Scanner Cable             (DB-9 to DB-9)
  • Automotive Plug power cord

Buy the BC-SGPS Kit here

For All GPS enabled scanners:

  • Make sure that the GPS Baud Rate on the scanner is set to 9600 Baud. The default rate on the scanner might be set to 4800, be sure you adjust it to 9600 when using this device. The rate is set in the Settings Menu on your scanner, please refer to the Owner’s Manual for the specific method of adjusting this on your scanner.
  • For non-database scanners as well as when using Favorites Lists on scanners with the built-in database you must have Location Control enabled and a proper set of GPS Coordinates (Latitude and longitude)
  • Use ONLY the power cord that comes with the kit, it includes a voltage reduction device to provide the proper voltage for the adapter box. It will not power scanners other than the SDS100 and BCD325, and then only when used with the adapter box and GPS.

SDS200

Connect the Phone wire cable from the GPS receiver directly to the GPS port on the back of the scanner. No other cables are needed.

SDS100 and BCD325P2 scanners:

Connect the GPS Receiver to the Adapter Box with the grey Phone Cable then connect the Adapter Box to the scanner’s USB Mini port with the USB-Mini cable. Plug the Adapter Box into a cigarette lighter socket in the car. This will power the radio along with the GPS.

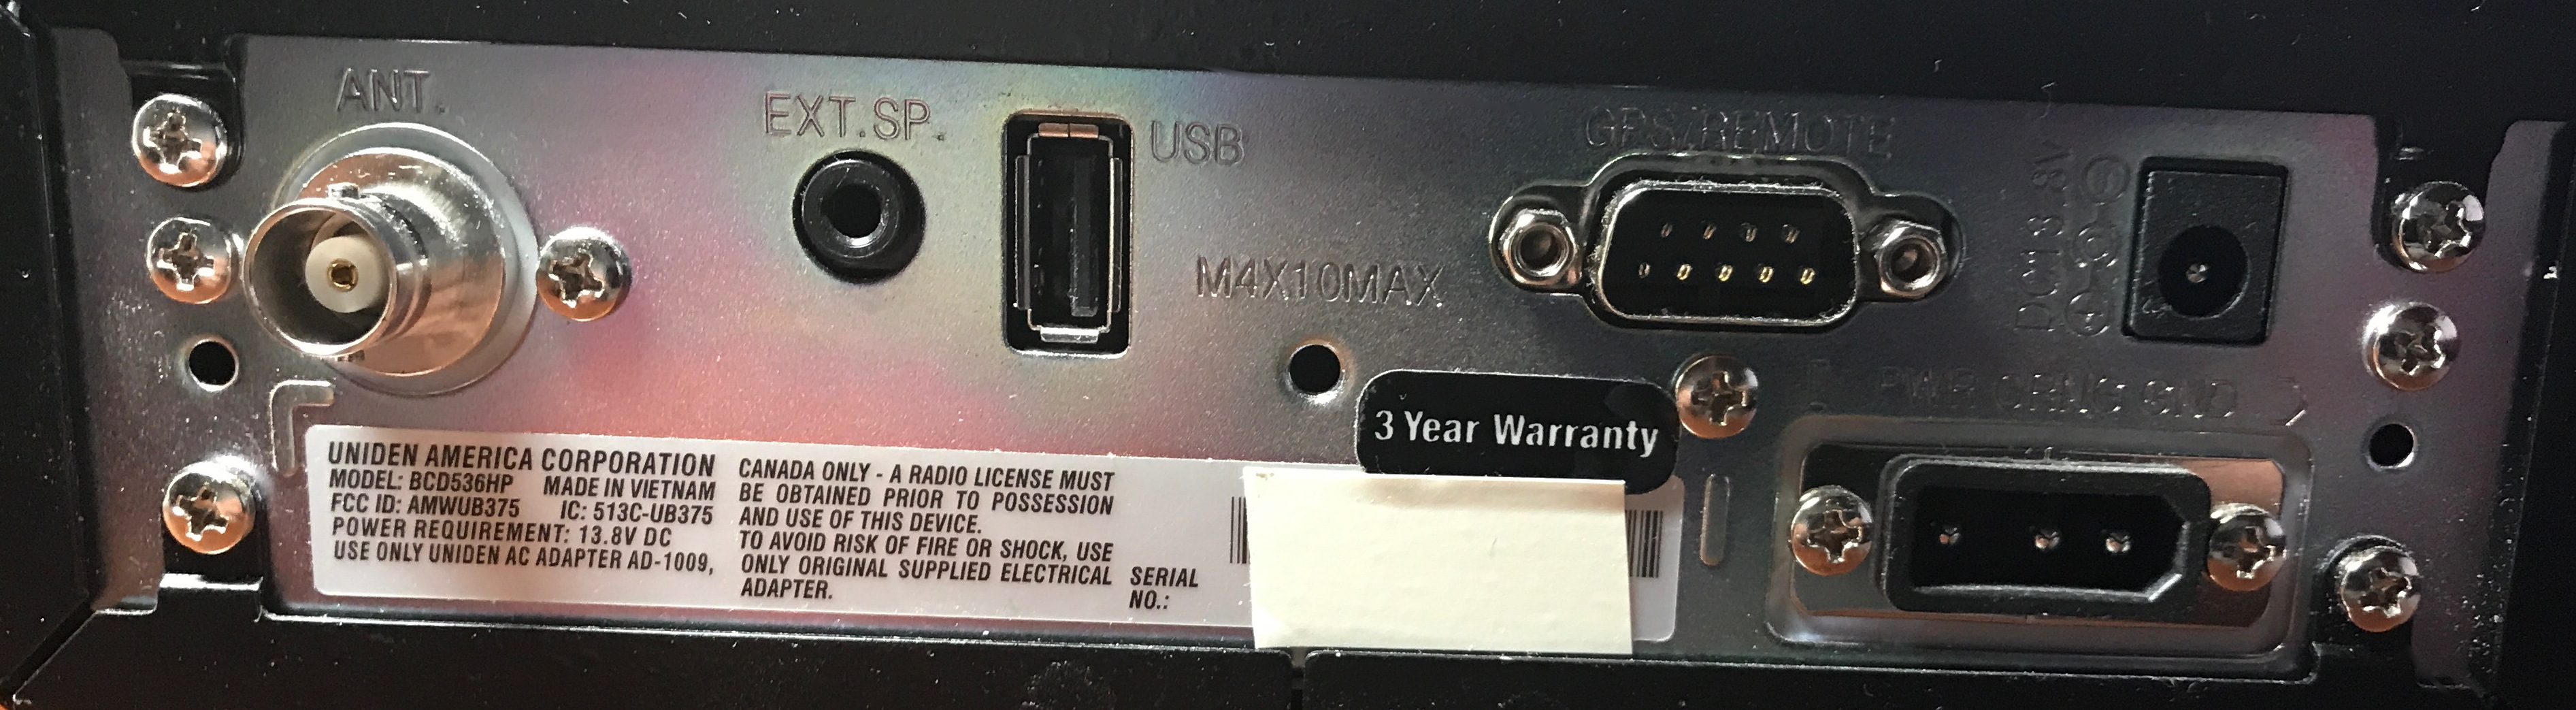
BCD536HP, BCD996 series and BCT15 series scanners:

Plug the GPS Receiver to the Adapter Box with the grey Phone Cable, then use the DB-9 to DB-9 Mobile Cable to connect the Adapter Box to the rear Serial Port of the scanner. This will NOT power the scanner.

HomePatrol 1 & 2 Scanners:

Connect the GPS Receiver to the Adapter Box with the grey Phone Cable, then use the Handheld Scanner Cable between the Adapter Box and the GPS Port on the right side of the HomePatrol scanner. This will NOT power the scanner.

Handheld scanners (BCD436HP, BCD396T and XT, BC346) Connect the GPS Receiver to the Adapter Box with the grey Phone Cable, then use the Handheld Scanner Cable between the Adapter Box and the GPS Port on the right side of the HomePatrol scanner. This will NOT power the scanner.

Railroads, NXDN and PTC

For years the rumor mills have been rampant with reports that the railroads are going to be going to NXDN at any time and our older analog scanners will no longer be useful form listening to rail traffic. Then all of a sudden the big focus was on PTC (Positive Train Control) and NXDN activity slowed considerably. So now what is the story on NXDN and can we still hear railroads when and if they switch?

First the background:

Railroads have used good old plain analog FM for decades and have been a staple of scanner listeners from the start. With almost 100 VHF channels between 160.215 and 161.610 it is simple to listen to, even if you don’t know what channels they actually use. Just scan all the channels or set the scanner to search them. A few years back they (and most other radio users) switched to what is called “Narrow Band”, where a smaller RF footprint is used to allow more channels to be stuck in between existing ones.

Eventually the railroads, thru their coordinating body called AAR (Association of American Railroads) decided that radio communications would be switched eventually to a digital format. While P25 was chosen at first, they changed their minds and decided to use NXDN instead. This was based on cost in part and while this meant cheaper radio equipment for the railroads, NXDN scanners are more expensive for consumers.

The plan was for railroads to replace their radio equipment with NXDN capable radios and when all the radios were in place they would start switching over piece by piece. Since railroads are very intertwined this had to be done in an orderly and planned fashion. Systems with limited scope, such as yards and shops, have been switched in some areas but for the most part the vast majority of radio traffic on the railroads is still on analog as they have been forever.

The biggest reason railroads have not switched over to NXDN already for Road and other operations is PTC. Positive Train Control is a system mandated by federal law that helps control the operation of trains to prevent collisions. After a series of crashes, including one in California where the engineer of a train was texting and failed to stop properly, PTC was mandated. This is a huge undertaking by the railroads, pretty much reinventing the wheel on how trains are operated and controlled. It requires huge investments in technology, both on the train and on the track as well as in the dispatch centers.

Due to the huge investments in money, effort and training involved in PTC other technology, including the NXDN conversion, have been slowed considerably. PTC has taken much longer and much more money than first anticipated and the same staff that would have been tasked with the NXDN conversion have been working on PTC. Once PTC is completed and paid for the railroads can start back to work on NXDN.

Most FCC licenses for railroad frequencies have already been updated to add NXDN and any new radios purchased are usually NXDN capable. As existing non-NXDN capable base station and lineside radios are replaced due to age, defect or otherwise they are usually replaced with NXDN capable units, but programmed for analog. Once dates are set for conversion to NXDN then they will be reprogrammed for that and NXDN operations will start. Locomotive, vehicular and portable radios are handled the same way, capable of NXDN but used in the analog mode until the switchover is scheduled.

So, what does all this mean for the scanner listener? Well, the answer is that when they switch to NXDN you will need an NXDN capable scanner to hear them. There are several scanners available now that will work for NXDN systems, these include the TRX-1/2, the BCD325/996P2, the BCD436/536HP and the SDS100/200. (Remember that Uniden scanners require the extra-cost NXDN upgrade for these channels.)

With the NXDN conversion there are going to be some other changes. More voice channels will be available, the technology increases the number of channels available. Some traffic that is currently done by voice might be converted to data or text. There is also the possibility of using encryption, although we really hope they don’t!

Questions? We have answers!

Here are a few of the common questions we get here at Scanner Master’s World Headquarters as well as the answers we provide. If your question isn’t listed please call us and ask.

Q: Do you have scanners that will allow me to hear Encrypted/Scrambled communications?

A: Nope! There are 2 reasons why we don’t sell scanners that work on encrypted channels. First of all it is illegal. Our people like sleeping in their own beds at night and not on cots at the county jail. Second, even if it were legal the technology just isn’t there to break modern encryption, especially on a device sold to the public.

Q: Do you sell scanners that can hear cell phones?

A: Nope, sorry, for the same reasons we do not sell encryption capable scanners, it is illegal and impractical. Years ago one could clip a diode and open certain scanners for the old analog cell phones but those days are long past.

Q: Can you tell me the frequency for my hometown police department?

A: Sure we can. You can also find the freqs at www.radioreference.com

Q: Are you guys the same guys at RadioReference? Broadcastify? Uniden? Whistler?

A: No, we are ScannerMaster. We are friends with these other companies and do business with them but we are all separate companies. We sell products from Uniden, Whistler and others but if you need support beyond what we are authorized to do we will refer you to the right place. We can often answer a quick question here and there about these places but we have no access to their files.

Q: Can you fix my scanner?

A: We do offer a programming service and programmed replacement SD Cards for ZIP Code scanners but we do not do repairs or sell internal parts. Newer scanners should be sent to Uniden or Whistler for authorized repairs, One great source for older scanners repairs and parts is G&G Communications, they can be reached at 585-768-8151 or http://www.gcomradio.com

Q: Can my scanner be upgraded to DMR/ProVoice/NXDN?

A: Well, that depends on the scanner you have. Here is a list of the scanners that can be upgraded for these modes. Some of these can change in the future so be sure to check back! If you have an older scanner then it cannot be upgraded for these modes.

Maker            Model             DMR               ProVoice        NXDN            Notes

Uniden            BCD996P2     Paid                 Paid                 No

Uniden            BCD325P2     Paid                 Paid                 No

Uniden            BCD536HP    Paid                 Paid                 Paid

Uniden            BCD436HP    Paid                 Paid                 Paid

Whistler          TRX-1            Free                 No                   Free     Via Firmware Update

Whistler          TRX-2            Free                 No                   Free     Via Firmware Update

Whistler          WS1095          Free                 No                   No       Via Firmware Update

Whistler          WS1098          Free                 No                   No       Via Firmware Update

Whistler          WS1080          Free                 No                   No       Via Firmware Update

Whistler          WS1088          Free                 No                   No       Via Firmware Update

GRE                PSR800           Paid                 No                   No       Only thru Whistler

RS                   PRO668          Paid                 No                   No       Only thru Whistler

RS                   PRO18            Paid                 No                   No       Only thru Whistler

All those weird ports on the back of the scanner

Modern scanners have a plethora of various ports, jacks and sockets on them. Here is a look at some of them.

Taking a look at the rear panel of the BCD536HP scanner there are 6 different ports on it. From left to right they are:

  • BNC antenna jack
  • External Speaker Jack
  • USB Port (used for WiFi unit only on the 536)
  • GPS Serial Port
  • 3-pin power port
  • Coaxial power port

Other common ports on scanners include:

  • USB programming port
  • Record jack
  • Headphone jack
  • Various serial ports.

Let’s look at each port and what it is used for: (*Bonus! See below for an explanation of the weird hole smack in the middle…)

Antenna Jack:  Of course this is used to connect an antenna to the radio. Most scanners these days use BNC, the little push and turn job you see in the picture. Some handled scanners use the smaller SMA connector. Some older scanners had Motorola or even SO139 connectors and some had both an external connector and an internal threaded connector with a hole in the case to insert it.

External Speaker:  These are used to plug in an external speaker and are different than headphone jacks. Speaker Jacks do not limit the volume like a headphone jack will. When you plug in a speaker into the external speaker jack the inside speaker is disconnected.

Headphone Jack:  The Headphone jack has a limiting circuit to protect from overly loud sound that can damage your hearing. Otherwise it works much like the external speaker jack. Headphone jacks are usually in the front panel of desktop scanners while speaker jacks are usually on the rear. Handheld scanners usually just have a headphone jack on the top.

Record Jack:  The Record Jack allows one to pull audio from the scanner at a constant level that is not affected by the volume control. This is important when the radio is used as a source for recording or streaming. Some older RadioShack scanners and some current Uniden scanners have record jacks.

GPS Serial Port:  Unique to Uniden scanners, the DB-9 Serial port (male) is used mostly to connect a GPS receiver to allow location based scanning. It can also be used to program or control the scanner with the properly constructed cables. Do not confuse this with the female DB-9 port used for programming on older scanners like the BC780XLT or the BC898T

USB Programming port:  Most scanners these days use a USB-Mini port on the front or side to program and control the scanner. On many handheld scanners these ports are also used to charge the batteries and power the radio. On the BCD325P2 a special cable is used to connect a GPS to this port.

Other serial ports:  Some older scanners use different type serial ports. Older Unidens (like the “XT” series) use a unique 4-pin square connector for programming and connection of the RH-96 remote head. HP-1 and HP-2 scanners use that same port style for connecting to a GPS. Older design RadioShack/GRE/Whistler scanners use a jack that is just like a headphone jack for serial port connections.

Coaxial Power Port:  Most desktop/mobile scanners have a coaxial power port to provide 12 VDC to the scanner. There are 2 different jacks in common use. The majority of Uniden mobile and desktop scanners use a “Type M” male jack while most recent RadioShack, GRE and Whistler mobiles use a “Type T” female jack. Both use center-pin positive. Some older handheld scanners use smaller coaxial power ports but newer portable scanners usually use the USB port for charging and external power.

3-pin power port:  This is another unique to Uniden port, similar to the power port used on some of their CB products. On Uniden scanners there are the regular black and red wires for power and a third orange wire used to control the brightness of the display when connected to the lighting circuits of the car.

Discriminator Jack:  This is probably the most popular jack that doesn’t come on scanners. Discriminator audio is used to provide an unfiltered audio source mostly for data decoding. This type of decoding usually does not work from the record or speaker jacks due to the filtering circuitry in the radio. Scanners usually do not come with jacks for this but it is often added on by advanced scanner hobbyists to allow data decoding.


Bonus Round

See that threaded hole smack in the middle of the back panel in the picture at the top of the page? Most Uniden base/mobile scanners have that. It is used to allow a rear bracket to stabilize the radio under the dashboard. It is not mentioned in the owner’s manuals but is shown in the diagrams.

WiFi on BCD536HP. How does it work?  What you can and can’t do with it.

The Uniden Bearcat BCD536HP is the only scanner that has the capability of being directly controlled by WiFi. By using the included WiFi dongle one can connect a smart phone or tablet to the scanner and listen to and control the scanner with the device. There are some other uses for the WiFi dongle as well.

Uniden has provided free “Siren” software (available for free via the Apple iTunes store or Google Play Store) to allow you to use your smart device as a scanner controller. You can even use this as a remote head for the scanner if mounted in a vehicle or to listen to your scanner from the patio or another room of the house for a scanner installed in the home. Some third party software allows you to use the WiFi feature to connect the canner to the computer without the need to plug in a cable.

There are a few things that the WiFi dongle will not work for, this includes database and firmware updates and other programming.

The Wifi dongle is designed specifically to work with your home or office WiFi network. While we have read of people using it for remote access this requires such networking tools as VPN, if you know how that works you probably can figure it out. Sorry, we cannot help with notworking issues like this!

To use the WiFi feature you need to understand the two modes involved; Infrastructure and Access Point.

Infrastructure Mode allows your scanner to connect to your home or office WiFi. This then allows you to connect to the scanner via third-party software like ProScan or RadioFeed or to the Siren application.

To get to Infrastructure Mode use the following steps:

Press Menu then select WiFi Setup>Select WiFI Mode>Infrastructure Mode

The radio will look for local access points and list them. When it displays the list select your router’s SSID name.

Then enter your password for the WiFi access point. This is the same password you would use for setting up any other WiFi device on your network. To enter the password you scroll thru the letters and use the 4 and 6 buttons to move the curser.

Access Point Mode allows you to connect you scanner to a smart phone or tablet (iOS or Android) using the free Siren software. You would use this when you are not in range of your WiFi system, such as when the radio is mounted in a vehicle. This allows you to use a phone or tablet as sort of a remote control head for the scanner.

In Access Point Mode the 536 acts as an Access Point and provides an SSID which you can change or leave at the default. You then connect your phone or tablet to that WiFi SSID and enter in the IP address in the Settings of the device. The IP address can be found in the WiFi settings on the scanner.

Siren is the free app available at the Apple iTunes Store for iPhones, iPads and iPod Touch’s. It is also available for Android devices at the Google Play Store.

Siren is a neat way to use your 536 scanner but there are limits to it. It will only work with the 536, and it has limited abilities for control. It can set the range, select Quick Keys, set the squelch and start and reply the recording features but that is pretty much all she wrote. There is also a 2-3 second delay in hearing the audio compared to the radio itself.

The WiFi feature on the 546 is unique and useful as long as you know its limits.

Update the firmware on your scanner!

Why would you want to update the firmware on your scanner, and how do you do it?
First, let’s explain WHAT firmware is. Firmware is the operating system of your radio, it works behind the scenes and tells the radio how to deal with things like keyboard inputs, frequencies, etc. Just like your computer or phone has an operating system (Like Windows 10, iOS etc.) scanners do too. Remember, scanners these days are miniature computers; they work much in the same way.

Firmware updates are released for a couple reasons. They either fix a problem or add/change features. Sometimes they do both. As an example, the BCD436HP’s most recent firmware update added the ability to add ProVoice and DMR digital protocols, before that firmware updates addressed an issue with clock settings.

When updating firmware one must follow ALL instructions CAREFULLY! You have the possibility of “bricking” your radio if you don’t do it right. This means that your $500 scanner may now be more useful as a brick than a radio… Follow the provided instructions to the letter and make sure that the program and firmware file you use is intended for your radio. The firmware for the PRO106 will not work on the WS1040!

Before trying to update the firmware on your radio make sure you have properly downloaded the firmware file itself as well as the installation program (if needed) BEFORE you start. If you do not have a replacement firmware file to install do not start the process since this erases the existing firmware to make the radio ready for the new version. No new version means no radio once you get going.

Some radios firmware updates are easier than others. The HomePatrol type radios use a program called Sentinel to check for new firmware versions and install them (easy, safe). Other Uniden scanners use a “Bearcat Version Updater” program to install a new update. GRE/RadioShack/Whistler scanners also use an application to install new firmware versions (nerve-wracking maybe).

What they all have in common is that they require a computer running Windows to update. (You can do it with a Mac running Windows with Parallels, Fusion, Bootcamp etc.) You also need the appropriate cable to connect from your computer to the radio. This is usually done via USB but some older radios use a Serial port.

Before updating your firmware make sure you have the following on hand:
• The radio you want to update
• The proper cable for your radio, along with the drivers already installed (if needed)
• The Firmware Updating program appropriate for your radio
• The actual firmware file itself (Imperative!)
• A strong sedative or plenty of alcohol to calm your nerves (optional)

Follow the instructions included with the firmware update TO THE LETTER. Make sure your radio and the computer can communicate properly. If you have programming software for your radio then read it first and save the programming file just in case you need to restore it to the radio. This also ensures that the radio and computer can communicate.

We also suggest that you check the RadioReference forum for your radio to see what other people’s experiences have been. Reading about someone else’s mistake is a lot easier than trying to fix your own.

Owners of PRO651 and PRO652 scanners that had tried to update their radios’ firmware versions had issues since no firmware updates were available until recently. Now one can download them and install them so previously bricked radios can be reincarnated.

ScannerMaster can update the firmware on many different models of scanners. Download the Hometown Programming Form for your radio and check the Firmware Update option if you would prefer our expert programmers to do this for you. We keep them heavily sedated all of the time already so their nerves are steady. Firmware Updates for “Zip Code Scanners” (HomePatrol, 436/536 and the TRX/WS1080/1088/1095/1098 series scanners) is included with the Setup and Optimize package already, it is an extra cost option for other scanners. If you aren’t sure call us and we will let you know.

When bad things happen to good scanners: SD Card Corruption

All of the various “Zip Code” type scanners such as the Uniden HomePatrol, BCD436HP or BCD536HP, Whistler WS 1080/1088/1095/1098 or the GRE and RadioShack versions use a Micro-SD Card to store the database and recordings. This SD Card is much like a disk drive without moving parts, it can be written to and read by a computer or a device; in this case your scanner.

Occasionally these cards can get corrupted which causes them to stop functioning. The scanner will display an error message and will not operate until you repair or replace the SD Card. Thankfully this is not usually a serious issue and rarely results in anything other than some annoyance. The worst that can happen is that you lose your Favorites Lists and any recordings you may have on the card.

First let’s talk about WHY this happens. Most of the time it is due to the power being removed from the radio abruptly. These scanners are basically small computers and, like all computers, they need to be shut down properly. By doing so the radio has a chance to finish writing information to the SD Card. If the power is removed before this is done then an incomplete or corrupted file may be left. When you turn on the radio the next time it doesn’t know what to do with the file and displays the error message. While this does not occur every time the radio is improperly shut down, it only has to happen once to ruin your day.

Now there is always the possibility that the card or even the radio itself is defective but that is very rare.

What can you do to prevent this from happening to you? The best thing you can do is to make sure you turn the radio off before removing power to it. If you have it mounted in a vehicle be sure to turn off the radio by use if the volume/power knob before starting the car or turning off the ignition. If the radio loses power while still turned on then the card can get corrupted. Same goes for portable radios. do not pull the batteries unless the radio is turned off.

OK, my card got corrupted, is my scanner dead? Usually no. These cards can usually be reformatted and the database rebuilt. Even if the card is shot it can be replaced and the new card set up for your radio. You can get replacement (or spare) Micro SD Cards almost anywhere.

What can you do if this occurs to you? First make sure the card is really corrupt, some times they are just loose. Remove the card and reseat it, making sure that it clicks into place. When you turn on the radio, if it works then you are back in business. If you still get the error then you will likely have to reformat the card.

Of course the easiest way to get past this is to let us fix it for you! Just download, print and fill out the form at https://www.scannermaster.com/v/vspfiles/files/pdf/homepatrol-servies-order-form.pdf. Send it to us with the radio and we will do the rest!

To reformat the card it is best to use an application specifically for this. You can use a free program available from https://www.sdcard.org/downloads/formatter_4/. Download the one for your version of Windows and install it. You can use an SD Card reader if you want or leave the card in the radio and connected to the computer in Mass Storage Mode. If you reformat it using Windows directly it may not be done in the proper format. Sorry Mac guys; you need Windows for this!

Once reformatted you need to reinstall the database. On Uniden scanners this is done as follows:

1: In Sentinel under the Home Patrol menu select Clear User Data, click on the Display All Drives box.

2: Be sure to select the correct drive letter then click OK. (You do not want to erase your C Drive!)

3: Run Sentinel on the computer and select the Update Master HPDB option in the Update Menu.

4: In Sentinel under the HomePatrol menu select Write to HomePatrol .You may need to select that drive again, but it will not show the serial number of the radio this time.

5: Eject the card and put it back into your scanner (if not already there). When you turn on the scanner you should be all set. You many need to reset your location, Service Types etc.

Of course this requires that you have Sentinel running in a Windows computer. If you don’t have Sentinel installed (it comes on the SD Card…) you can download it from Uniden’s website.

Whistler, GRE and RS scanners use slightly different procedures, check the manual for your radio for these.


Drivers? What are they and why do I need them?

If you have a scanner and a computer you will most likely want to use one with the other. Computer programs (like ARC products) are great for programming and controlling scanners.

Windows however tries to make life difficult for us and requires almost everything we connect to a computer to have “drivers”. Drivers are basically small programs that allow the computer and device to talk to each other, kind of like an interpreter.

If the stars are all aligned and all is well with the world the device driver will load automatically when you plug in the device. If not then you will have to install a driver to make it work.

We have a link here that helps scanner users get drivers and load them. This page also links to download pages for the drivers needed by many scanners.

Depending on the scanner you have the driver might be connected to the radio or to a separate cable. If your scanner has a standard USB port on it (such as a HomePatrol, a BCD996P2, BCD325P2 or some of the other newer model Uniden and Whistler scanners) then the driver goes to the radio itself.

If you have an older radio with a USB-serial adaptor cable, such as a BCD996XT, BCD396XT, PRO106, a PSR 500/600 etc. then the driver is matched to the cable (like the Uniden USB-1, or the blue, orange or black RadioShack/GRE/Whistler cables). Once the cable has the proper driver installed and a serial port (Comm-X) number assigned it can be used for any compatible radio with no further issues.

Some radios use an old fashioned serial port with a DB-9 connection, either on the radio or it’s programming cable. These require a serial port on the computer itself or the use of an USB-Serial adaptor. If you use a USB-Serial adaptor then the drivers connect to the adaptor.

The common denominator for all this is that the radio gets a “Com Port” number assigned. This will show up as “COM1” , “COM36” etc. Once this number is displayed in the Device Manager use that number in your programming software so the radio and program can communicate. This is kind of like a channel number, if the radio and computer are both set to the same Com Port number they can talk.

Com Port and communication issues are the biggest problem faced with users of software and scanners. Once you get the drivers loaded and the program set to the right com port then you can read and write to the radio all you want.

Some older USB-Serial adapters and cables will not work with some newer versions of Windows, or with 64-bit versions of Windows. Others require newer drivers to be downloaded and installed. Once installed the drivers should automatically be loaded each time you plug in the cable but sometimes Windows may change the com port number so if you have problems check the Device Manager to make sure.

Select a Scanner Based on the Scanner Frequencies Used in Your City

Scanner RadioAny time you are looking at purchasing a new scanner, you need to make sure the scanner is compatible with the scanner frequencies in your area. Otherwise, you will be limited in the number of different channels you are able to monitor. The three radio frequencies used are digital, analog conventional, and analog trunking. Each type of scanner radio, whether it is a portable handheld unit, one installed in your vehicle, or one used in the comfort of your own home, picks up specific frequencies. Just like there are three radio frequencies, there are three kinds of police scanner radios designed to pick up the various radio frequencies.

It is important to first find out what frequencies various agencies utilize in your area for communications. There are several online resources available to help you determine what scanner frequencies are used. One of the easiest to use is on our sister site, www.policescanners.net. Simply click on “Choose a Scanner,” and enter in the range and your zip code, to see what scanner models are recommended for your location. We highly recommend using this resource before you purchase your new police scanner radio. It is free to access this information, and it provides an overview of what the various agencies use for their communications and which type of scanner is best. Since radio systems do sometimes change ahead of what is posted publicly on the website, you may wish to call and double check with your dealer for the latest information about the radio systems in your area.

Now that you have a better understanding of what scanner radio frequencies are used in your home town, it is time to start shopping for a new police scanner. To help you select the best scanner radio, look at the frequencies the scanner receives. Analog conventional scanners only monitor basic analog signals on FM and AM systems. These types of scanners allow you to listen to communications by police, fire, aviation, marine, railroad, amateur radio, racing, and FRS/GMRS transmissions. Keep in mind, if local law enforcement and fire agencies use either analog trunking or digital systems, you will not be able to monitor their communications.

An analog trunking scanner picks up both conventional and trunking analog transmissions, but not digital transmissions. Trunking is a widely used communications system, in both large and small communities, as it allows multiple agencies to share the same trunking system. Transmissions jump from one channel to the next and often each agency has its own talk groups assigned to specific trunking frequencies. Most scanner radios allow you to manually program talk groups and frequencies so you are able to hear communications for the agencies you want to monitor.

A digital scanner is a radio scanner capable of monitoring all three types of scanner frequencies. It can be used to listen to analog, analog trunking, and digital communications. Digital scanners provide the most flexibility, especially if you like traveling or have a job where you are on the road most of the time and want to enjoy listening to your scanner. With more and more agencies moving to digital transmissions, you may want to invest in a digital scanner, now, and be ready when systems are upgraded in your city.

For more information or further assistance in selecting the best scanner radio, contact us directly by calling 1-800-SCANNER (1-800-722-6637).