Uniden Location Based scanner hints

Uniden’s line of Location Based scanners allow one to enter their location (usually by ZIP Code) to load local channels without needing to know frequencies, systems, talkgroups and other technobabble. There are a couple things to remember and a couple byproducts that can make life your scanner easier. These scanners include the HomePatrol 1 & 2, as well as the BCD436HP and BCD536HP.

First the good stuff! Did you know that you do not need the scanner itself to do most updates, including firmware? That’s right! If the radio is mounted in the car (especially for the BCD536HP) just remove the memory card and connect it to your computer using a card reader. Since these are “Mini SD-Cards” you will need a card reader that will read them or one that works with standard SD Cards and a Mini SD-Card adapter. Just plug the SD card into the card reader and then the reader into the computer and run Sentinel just like you would if the radio was plugged in. (When doing the Extreme, DMR or ProVoice Updates you must do them on the radio itself as the code is installed from the keypad.)

SD Card readers are inexpensive and some computers have SD-Card readers built in. Remember that the Mini SD-Card requires the Full-Size adapter since most computer slots and card readers do not accommodate the Mini SD-Card directly. While Uniden doesn’t supply the adapter card with the radios they are easy to find and come with Mini SD-Cards you buy in the store. This leads us to the next part:

Get a spare card!

Why have just one SD-Card for your scanner when you can have several? SD-Cards are cheap these days. You can buy spare or replacement cards anywhere (including ScannerMaster) and keep them in case you have difficulties. One problem with SD-Card based scanners is that the cards can be corrupted if the power is removed while the radio is on. Since the radio has to write some closing data to the card, one must turn the radio off before removing power or the batteries. Sometimes a voltage spike could cause this as well.

With a spare programmed SD-Card you can be ready if you have a problem. I have found that having a spare seems to prevent the need for it; the only time I corrupted a card was when I was on the road with no computer. I have since always carried a programmed spare card and never had a corruption issue. Coincidence? I think not!

Update your radio.

Using a card-reader to update the SD-Card in your Uniden Location Based scanner is simple, you can update the firmware, database and Favorites Lists directly on the card itself, plug the card in and the radio will automatically be updated. When you do this the radio’s firmware will be updated the first time you power the radio up with the new or reprogrammed card. The database and any enabled favorites lists will then load.

On the 536 you can just pop the card in and out from the front panel. Be sure to turn the radio off first! On HomePatrol and 436 radios the card is behind the batteries, so to access it remove the batteries, On the 436 slide the small metal retaining clip over and remove the card. To replace the card slide it into the clip, fold it down and slide the clip over again. On the HomePatrol the care pops in a slot, gently press it in a tiny bit to release it. When replacing the card carefully pop it into the slot until it clicks in.

Buy a new card from ScannerMaster!

When we do our Setup and Optimize on a scanner most customers would send the radio in to us, we do the updates etc. and then ship the radio back to the customer. We soon figured out that it would be easier and cheaper for the customer to buy a replacement card, have the card programmed and delivered. This way an expensive radio isn’t being shipped across the country twice, risking damage or loss. You get a new SD-Card, of a type faster and more reliable than that supplied with the radio. If your old card still works then you already have a spare. You save up to 10 days of transit time, don’t have to pay expensive shipping fees. Mailing an SD-Card costs less than $2.00, shipping a radio costs $15-25 each way. We also include the Full-Size adapter!

You can also create SD-Cards yourself with Sentinel. Remember that you need to use the “Clear User Data” menu item on a new card to format it for use on your Uniden radio.

Whistler SD-Card based scanners can be updated to a lesser extent, the DSP and firmware updates must be done thru the radio itself. The mobile Whistler scanners (WS-1095, WS-1098 and TRX-2) come with a full-size SD Card, the portable Whistler scanners use Mini SD Cards. Mini SD-Cards can be used in the mobile radios with the full-size adapter.

Firmware, Firmware, who needs Firmware?

OK, you have this whiz-bang multi-hundred dollar scanner sitting there and you want to make it much more better! You read about Firmware Updates but haven’t a clue what this means. Should you update the firmware on your scanner? If so how do I do it? What does it all mean? What is the meaning of all this? Can you do this for me?

First, let’s explain WHAT firmware is. Firmware is the operating system of your radio, it works behind the scenes and tells the radio how to deal with things like keyboard inputs, frequencies, etc. Just like your computer or phone has an operating system (Like Windows 10, iOS etc..) scanners do too. Remember, scanners these days are miniature computers, they work much in the same way.

Firmware updates are released for a couple reasons. They either fix a problem or add/change features. Sometimes they do both. As an example, the BCD436HP’s most recent firmware update added the ability to add ProVoice digital, the version before that addressed an issue with clock settings.

When updating firmware one must follow ALL instructions CAREFULLY! You have the possibility of “bricking” your radio if you don’t do it right. This means that your $500 scanner may now be more useful as a brick than a radio… Follow the provided instructions to the letter and make sure that the program and firmware file you use is intended for your radio. The firmware for the PRO106 will not work on the PRO97!

Before trying to update the firmware on your radio make sure you have properly downloaded the firmware file itself as well as the installation program (if needed) BEFORE you start. If you do not have a replacement firmware file to install do not start the process since this erases the existing firmware to make the radio ready for the new version. No new version means no radio once you get going.

Some radios firmware updates are easier than others. The HomePatrol type radios use a program called Sentinel to check for new firmware versions and install them (easy, safe). Other Uniden scanners use a “Bearcat Version Updater” program to install a new update. GRE/RadioShack/Whistler scanners also use an application to install new firmware versions (nerve-wracking maybe).

What they all have in common is that they require a computer running Windows to update. You can use also a Mac as long as you are running Windows on it (with Bootcamp, Parallels, Fusion etc.). You also need the appropriate cable to connect from your computer to the radio. This is usually done via USB but some older radios use a Serial port.

Before updating your firmware make sure you have the following on hand:

  • The radio you want to update
  • The proper cable for your radio, along with the drivers already installed (if needed)
  • The Firmware Updating program appropriate for your radio
  • The actual firmware file itself
  • A strong sedative or plenty of alcohol to calm your nerves (optional)

Follow the instructions included with the firmware update TO THE LETTER. Make sure your radio and the computer can communicate properly. If you have programming software for your radio then read it first and save the programming file just in case you need to restore it to the radio. This also ensures that the radio and computer can communicate.

We also suggest that you check the RadioReference forum for your radio to see what other peoples experiences have been. Reading about someone else’s mistake is a lot easier than trying to fix your own.

Owners of PRO651 and PRO652 scanners that had tried to update their radios’ firmware versions had issues since no firmware updates were available until recently. Now one can download them and install them so previously bricked radios can be reincarnated.

ScannerMaster can update the firmware on many different models of scanners. Download the Hometown Programming Form for your radio and check the Firmware Update option if you would prefer our expert programmers to do this for you. We keep them heavily sedated all of the time already so their nerves are steady. Firmware Updates for “Zip Code Scanners” (HomePatrol, 436/536 and the WS1080/1088/1095/1098 series scanners) is included with the Setup and Optimize package already, it is an extra cost option for other scanners. If you aren’t sure call us and we will let you know.


Zip Code Based Scanning: How does it work?

You say you are interested in a “ZIP Code” scanner like a HomePatrol, BCD436HP or BCD536HP? You like the idea of having the scanner do all the programming by itself but don’t understand how it works? Here are the answers you are looking for! The HomePatrol and x36 scanners are wonderful technology and take a lot of the work out of scanning. By understanding how they work you can better understand how to use the radio and address any issues that might pop up.

First of all there are a couple misconceptions about these scanners. One common one is that they will only hear things in the chosen ZIP Code. This is incorrect. “ZIP Code” scanners use the location you enter into the radio (either by ZIP Code, city and state or by GPS coordinates) as a CENTER POINT. You then enter in a “Range” in miles, this creates a circle around that location. The larger the Range setting makes a larger circle and more stuff that will be programmed into your radio. The Range setting only affects what is programmed into the scanner, not the actual distance it will receive from.

When you set a location and range the radio will automatically program in all the services you selected within the circle and allow you to listen to it. If a Service Type is unavailable to be selected (greyed out) that means the database has no channels with that Service Type within the circle.

So what happens when you need to listen to something 20 miles away but really don’t want to listen to another area closer in? This is where the “Avoid” system comes in handy. Learn how to use the Avoid key on your scanner and use it to lockout Channels, Departments or Systems from your radio to help tailor your listening. “Avoid” works much like the Lockout function in older scanners. “Temporary Avoid? Means that the item will be locked out until the radio is shut off, the item will return the next time you turn on the radio. “Permanent Avoid” will cause it to stay locked out until you go in and “unavoid” it.

There is another way to easily tailor your HomePatrol or “x36” scanner to your preferences. This is by using Favorites Lists. Favorites Lists are basically your own frequency sets for your area. Instead of using the Nationwide Database and going strictly by location, a Favorites List will allow you to import Systems from the Nationwide Database or create your own from scratch. This is usually done with the Sentinel program that comes with your scanner. You can also work on Favorites Lists with ARC-Patrol (for HomePatrol’s) or ARC-536 (for the BCD436HP and BCD536HP).

To create a Favorites List you would import items from the Nationwide Database into it. You can then edit the information but adding or deleting your own information. You can also create a List from scratch and built it from the ground up.

If you selected ScannerMaster’s Optimize option for your HomePatrol or x36 scanner we would have created a Favorites List for you for your area. You can edit this if you want with Sentinel. You can also edit this from the scanner itself but this can be time consuming and kind of daunting. It is a bit easier on the 436 and 536 than the HomePatrol but we recommend that you do this in Sentinel, trust me it is a lot easier!

So where does the database itself come from? It comes from you and me! A website called RadioReference (www.radioreference.com) hosts a database where scanner users from all over the world share information. Each state and province has one or more Database Manager’s that filter submissions from users and update the main database. Once a week Uniden retrieves a copy of this database and makes it available to scanner users via Sentinel.

When bad things happen to good scanners: SD Card Corruption

All of the various “Zip Code” type scanners such as the Uniden HomePatrol, BCD436HP or BCD536HP, Whistler WS 1080/1088/1095/1098 or the GRE and RadioShack versions use a Micro-SD Card to store the database and recordings. This SD Card is much like a disk drive without moving parts, it can be written to and read by a computer or a device; in this case your scanner.

Occasionally these cards can get corrupted which causes them to stop functioning. The scanner will display an error message and will not operate until you repair or replace the SD Card. Thankfully this is not usually a serious issue and rarely results in anything other than some annoyance. The worst that can happen is that you lose your Favorites Lists and any recordings you may have on the card.

First let’s talk about WHY this happens. Most of the time it is due to the power being removed from the radio abruptly. These scanners are basically small computers and, like all computers, they need to be shut down properly. By doing so the radio has a chance to finish writing information to the SD Card. If the power is removed before this is done then an incomplete or corrupted file may be left. When you turn on the radio the next time it doesn’t know what to do with the file and displays the error message. While this does not occur every time the radio is improperly shut down, it only has to happen once to ruin your day.

Now there is always the possibility that the card or even the radio itself is defective but that is very rare.

What can you do to prevent this from happening to you? The best thing you can do is to make sure you turn the radio off before removing power to it. If you have it mounted in a vehicle be sure to turn off the radio by use if the volume/power knob before starting the car or turning off the ignition. If the radio loses power while still turned on then the card can get corrupted. Same goes for portable radios. do not pull the batteries unless the radio is turned off.

OK, my card got corrupted, is my scanner dead? Usually no. These cards can usually be reformatted and the database rebuilt. Even if the card is shot it can be replaced and the new card set up for your radio. You can get replacement (or spare) Micro SD Cards almost anywhere.

What can you do if this occurs to you? First make sure the card is really corrupt, some times they are just loose. Remove the card and reseat it, making sure that it clicks into place. When you turn on the radio, if it works then you are back in business. If you still get the error then you will likely have to reformat the card.

Of course the easiest way to get past this is to let us fix it for you! Just download, print and fill out the form at https://www.scannermaster.com/v/vspfiles/files/pdf/homepatrol-servies-order-form.pdf. Send it to us with the radio and we will do the rest!

To reformat the card it is best to use an application specifically for this. You can use a free program available from https://www.sdcard.org/downloads/formatter_4/. Download the one for your version of Windows and install it. You can use an SD Card reader if you want or leave the card in the radio and connected to the computer in Mass Storage Mode. If you reformat it using Windows directly it may not be done in the proper format. Sorry Mac guys; you need Windows for this!

Once reformatted you need to reinstall the database. On Uniden scanners this is done as follows:

1: In Sentinel under the Home Patrol menu select Clear User Data, click on the Display All Drives box.

2: Be sure to select the correct drive letter then click OK. (You do not want to erase your C Drive!)

3: Run Sentinel on the computer and select the Update Master HPDB option in the Update Menu.

4: In Sentinel under the HomePatrol menu select Write to HomePatrol .You may need to select that drive again, but it will not show the serial number of the radio this time.

5: Eject the card and put it back into your scanner (if not already there). When you turn on the scanner you should be all set. You many need to reset your location, Service Types etc.

Of course this requires that you have Sentinel running in a Windows computer. If you don’t have Sentinel installed (it comes on the SD Card…) you can download it from Uniden’s website.

Whistler, GRE and RS scanners use slightly different procedures, check the manual for your radio for these.


Hometown Programming, What it is and how it works

One of the services we have here at ScannerMaster is called Hometown Programming. You can send your scanner to us and we will program it for you. It is pretty much as simple as that! These services allow your radio to be ready to go as soon as you receive it.

There are actually 2 different programming services here, the right one for you depends on the radio you have or are going to buy. “Hometown Programming” refers to programming traditional scanners as opposed to “Zip Code” location based scanners. “Optimizing” refers to the updates and programming done on the various Location Based scanners, such as the HomePatrol, BCD436/536HP models and the newer Whistler WS1080/1088/1095 and 1098 scanners.

For Hometown Programming we will program in the county of your choice, including the local police, fire & EMS channels as well as the local State Police or Highway Patrol channels. One can add additional counties if they choose for an additional fee.

When we Optimize a location based scanner we will update the database on the memory card, make sure the radio firmware is current and create a local Favorites List for your area. We will also set the location to your ZIP Code.

We also offer firmware updates and installation of features like the Extreme or ProVoice Updates on certain capable scanners.

If you buy the scanner from us we can do the programming before we ship the radio to you. While this might delay the receipt of your radio by a short time, it saves the shipping costs and lets you enjoy your scanner as soon as you receive it, knowing that it has the most up to date programming available.

If you already have the scanner you can send it to us and we will program it then return it to you. Please make sure to use the forms found at

https://www.scannermaster.com/Articles.asp?ID=365

to make sure we have all the information needed to make the radio right for you. All the information you (and us) need is on the form, including the address to send the radio. Return time varies depending on the volume of radios in process but radios are returned as soon as we are done programming them.

While we do not do repairs on scanners there are times when all it needs is to be reprogrammed. If you aren’t sure call us at 1-800-SCANNER and one of our reps will help you decide.

Favorite Scanner: Uniden HomePatrol   

This weeks Favorite Scanner comes from our Programming Manager Greg Jolly. Greg likes the Uniden HomePatrol best for its ease of use.

The Uniden HomePatrol was introduced several years ago to address several concerns. Many people wanted to listen to their local police, fire and other radio activity but did not know (or want to know) how to program scanners. The HomePatrol brought a whole new dimension to scanning: instead of learning frequencies you just put in your ZIP Code.

The HomePatrol really makes Greg happy, being the ScannerMaster Programmer it makes his job easier! It just requires a periodic update to keep it humming along.

The HomePatrol 2 was introduced recently to cover those areas using “Phase 2” digital, otherwise it works the same as the original HomePatrol.


Scanner Tip: It is a Digital World!

Many areas of the country have switched to “Digital”. What does this mean for the scanner listener? What is “Digital” anyway?

First, before we go any further, the number one question we get about digital scanners is whether they will also work on analog. The answer is YES. All digital scanners work just fine on analog channels, always have and always will.

Digital radio means that instead of using a regular AM (where the amplitude [strength] is changed) or FM (where the frequency is modulated or changed) signal , a digital signal type is used. This is a signal that is converted to the base 0’s and 1’s, compressed, and sent out on the airwaves. A digital receiver then converts it back and lets you hear it.

There are several types of digital that are of interest to scanner listeners. The most common for police, fire and other public safety use is APCO’s P25 system. This is widely used by both trunked and conventional (non-trunked) radio systems across the country. Several manufacturers, like Motorola, Harris and others sell P25 systems and equipment. While the P25 standards are supposed to ensure that any companies radios will work on the various systems, in practice some companies often add new “features” that tend to lock out other company’s radios from working with the system.

P25 comes in several flavors. “Phase 1” is the original single channel-per-frequency protocol used on conventional systems and most trunked P25 systems. “Phase 2” P25 effectively splits channels using TDMA (See technobabble below) to allow 2 simultaneous conversations on the same frequency, effectively doubling the capacity of a trunked system. If your system uses Phase 2 be sure to get a Phase 2 capable scanner!

Technobabble here: Phase 2 uses Time Division Multiple Access, more commonly known as TDMA. The radio system divides a radio signal into timeslots of tiny fractions of a second. In Phase 2 systems a certain time slot is assigned to the “0” channel and the other slots are assigned to the “1” channel. This allows 2 conversations to be held at the same time on the same frequency. The communications are restored at the receiver so it can be processed and heard by the user. Decoding software like UniTrunker or Pro96Com will show these sub-channels as “851.0375/0 and 851.0375/1”.

Some areas of the country have gone to a system called “OpenSky”, manufactured by Harris. While these systems have not been successful in many instances, the systems in place cannot be monitored by scanners. Harris has since dropped OpenSky from its catalog and is selling P25 systems now.

One trend that is growing in some areas is the use of various “DMR” systems. These are sold under various trade names like MotoTRBO, NXDN and others. They all use fairly similar digital protocols but current consumer scanners do not cover them. There are some SDR (Software defined radio) and advanced receivers (like the new AOR DV1) that will allow one to monitor these systems. The reason many agencies select these is usually cost, the radios are fairly cheap, especially when compared to P25 radios. While they may not be as durable, the replacement costs are often less than a repair would be. Businesses however have embraced these cheaper forms of digital radio and they are common on business channels. Railroads have agreed on using NXDN digital modes but implementation has been very slow. Ham radio operators use some of these also, as well as D-Star.

Do not confuse digital voice with encryption. While it is true that many digital systems are encrypted these days, most are not and these are perfectly legal to listen to. Also do not confuse digital voice with digital data. Most police and fire agencies use some sort of data systems for MDT’s or video, these systems cannot be monitored without huge budgets and massive computing power. Listening to digital transmissions on an analog only scanner will not work, you will just hear noise.

Some people hear and understand received digital communications better than others. The absence of background noise sometimes makes it uncomfortable for some users, since it can be mistaken for non-radio conversations. Digital certainly sounds different than analog but occasionally causes issues with things like firefighters protective gear. Usually it is just a matter of getting used to how it sounds. In addition, when digital signals are weak they tend to get garbled. Many agencies call this “going digital” since it makes a weird noise.

Digital scanners are more expensive than analog ones. This is mostly due to licensing requirements for the technology. While prices have gone down recently they still are usually about twice as expensive than analog scanners with similar features.

Will there be more scanners with DMR modes like TRBO and NXDN? We don’t know yet, but if and when they do become available we will be among the first to have them. The AOR DV1 is available now and does receive several of the digital modes.

Drivers? What are they and why do I need them?

If you have a scanner and a computer you will most likely want to use one with the other. Computer programs (like ARC products) are great for programming and controlling scanners.

Windows however tries to make life difficult for us and requires almost everything we connect to a computer to have “drivers”. Drivers are basically small programs that allow the computer and device to talk to each other, kind of like an interpreter.

If the stars are all aligned and all is well with the world the device driver will load automatically when you plug in the device. If not then you will have to install a driver to make it work.

We have a link here that helps scanner users get drivers and load them. This page also links to download pages for the drivers needed by many scanners.

Depending on the scanner you have the driver might be connected to the radio or to a separate cable. If your scanner has a standard USB port on it (such as a HomePatrol, a BCD996P2, BCD325P2 or some of the other newer model Uniden and Whistler scanners) then the driver goes to the radio itself.

If you have an older radio with a USB-serial adaptor cable, such as a BCD996XT, BCD396XT, PRO106, a PSR 500/600 etc. then the driver is matched to the cable (like the Uniden USB-1, or the blue, orange or black RadioShack/GRE/Whistler cables). Once the cable has the proper driver installed and a serial port (Comm-X) number assigned it can be used for any compatible radio with no further issues.

Some radios use an old fashioned serial port with a DB-9 connection, either on the radio or it’s programming cable. These require a serial port on the computer itself or the use of an USB-Serial adaptor. If you use a USB-Serial adaptor then the drivers connect to the adaptor.

The common denominator for all this is that the radio gets a “Com Port” number assigned. This will show up as “COM1” , “COM36” etc. Once this number is displayed in the Device Manager use that number in your programming software so the radio and program can communicate. This is kind of like a channel number, if the radio and computer are both set to the same Com Port number they can talk.

Com Port and communication issues are the biggest problem faced with users of software and scanners. Once you get the drivers loaded and the program set to the right com port then you can read and write to the radio all you want.

Some older USB-Serial adapters and cables will not work with some newer versions of Windows, or with 64-bit versions of Windows. Others require newer drivers to be downloaded and installed. Once installed the drivers should automatically be loaded each time you plug in the cable but sometimes Windows may change the com port number so if you have problems check the Device Manager to make sure.

Product Test – 824-960, 13dBi, Terrawave Yagi Base Antenna

Customer Scott Fleming wrote us a short e-mail about the 824-960, 13dBi, Terrawave Yagi Base Antenna

Written By Scott Fleming, KG4PBD   

I wanted to take a moment to thank you and Scanner Master for your help in resolving my reception issues.

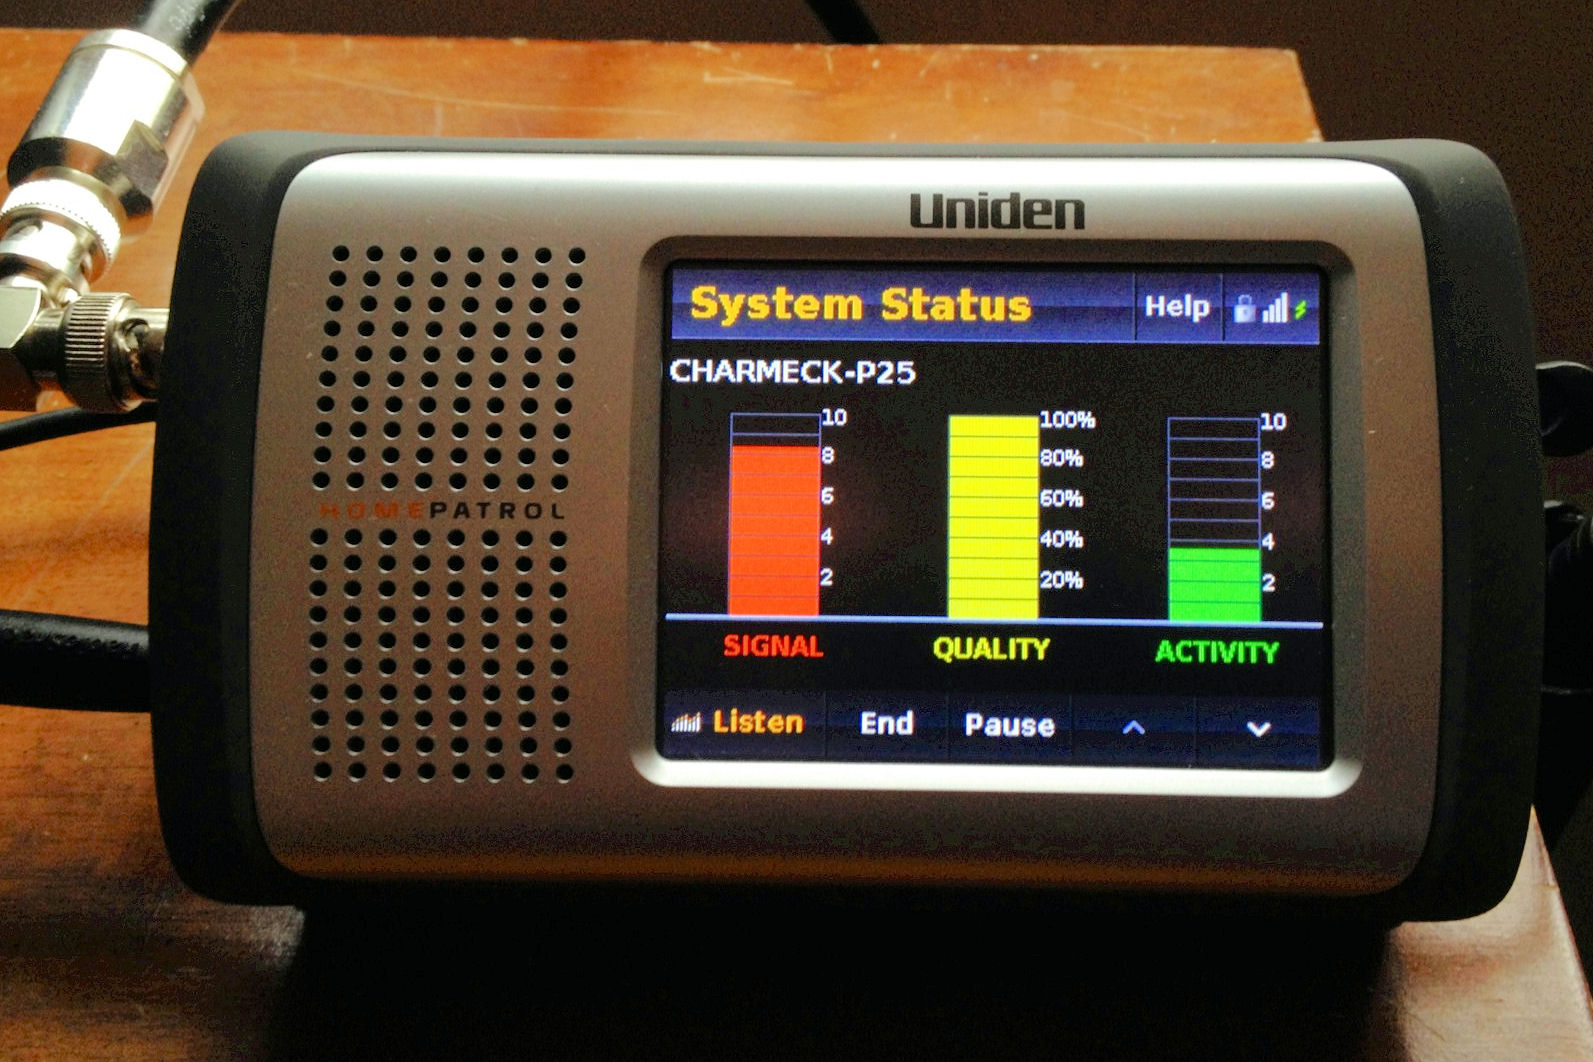
As you may recall, I purchased an HP-1 from Scanner Master and quickly discovered that the local P25 simulcast system was virtually un-monitorable from my home, due to severe multipath distortion. My location is mid-way between two simulcast sites for the Charlotte Mecklenburg P25 system. I ordered your 13dbi, Terrawave yagi antenna, along with 50′ of LMR-400 coax. My plan was to aim the yagi at the closest site (Matthews), and see if that eliminated the multipath distortion.

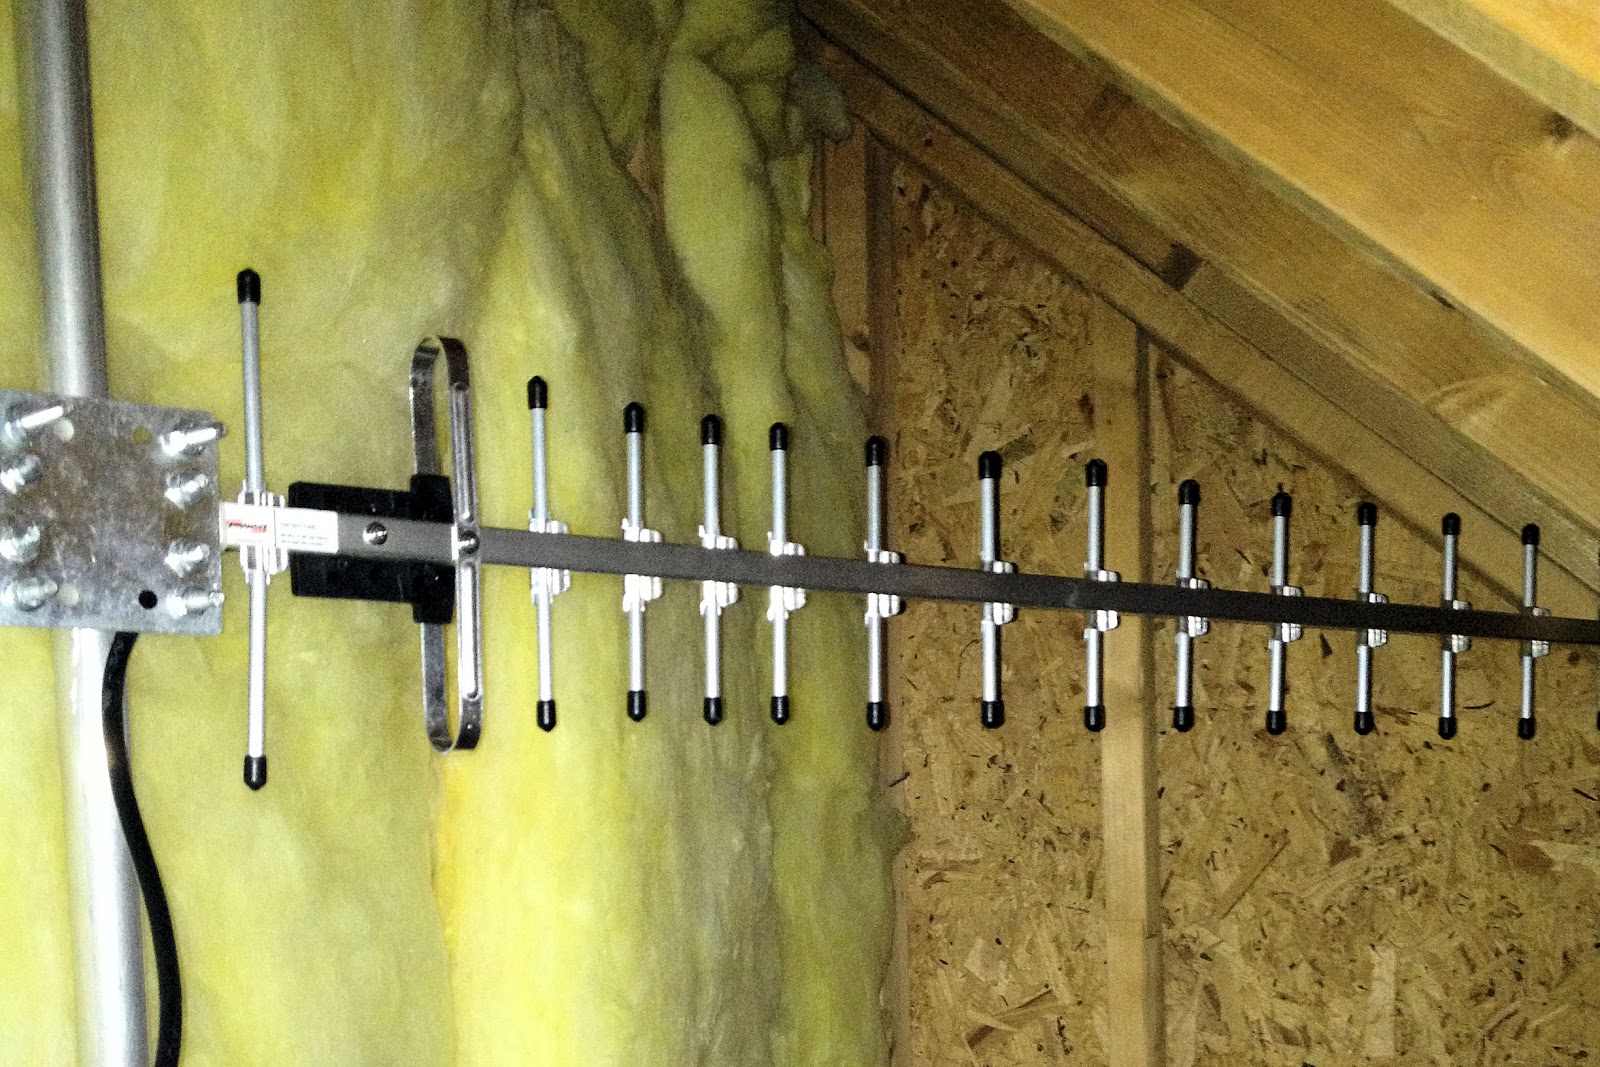
My preference was to install the antenna in the attic. I found a good location near a gable-end facing the direction of the tower, and mounted the antenna on a short mast. I tested the coiled coax at the antenna location prior to installing the coax, and immediately saw a huge improvement.

Now that the installation is complete I have almost 100% consistent decode on the system, with very few distortion issues. Overall, it sounds great and I’m very pleased! Check out two pics showing the installation bellow.

Thank you for your time in helping me. I look forward to my next purchase from Scanner Master!

Firmware Alert – Uniden HomePatrol-1 [2.03.01]


By Jonathan Higgins

Product: Uniden HomePatrol-1 (HP-1)
Firmware Update: 2.03.01

What included in the update?

  • Improved the SD Card Error message to help resolve troubleshooting issues.
  • Added a low-pass filter switch option for raw data output mode.
  • Added a remote command to control the low-pass filter switch.
  • Fixed the issue where the display mode setting was reset after cycling power.
  • Fixed that some systems were not appearing in Add Channel mode.
  • More details

    This update should fix a couple of the little bugs that were reported to Uniden. Nothing major in this update.
How to update your HomePatrol?

  1. Plug your HP-1 into AC Power to prevent power lost during update.
  2. Connect your HP-1 to your PC via the Programming cable.
  3. Open the Sentinel Software
    (If you don’t have the software download it here)
  4. Click “Update” tab
  5. Select “Update Firmware”
  6. Your HomePatrol should be selected, click “OK”
  7. The software will prompt you once the download is done.
  8. Disconnect the programming cable from your HP-1
  9. Please allow a few minutes for the update process to run.
  10. Your HP-1 will restart and the firmware update is complete.