
 By Jonathan Higgins
Spring is just around the corner, what better time to get a new antenna for your home or office.
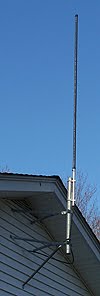
The Product: Ferret 8 Band Base Antenna
Last September, my dad and I installed the Austin Ferret 8 Band Antenna at my home in Attleboro, Massachusetts. After about 2 hours, my new antenna was up and running. For this project we used 50’ LMR-400 Coax cable, 2’ wall mount bracket, 4 port multi coupler, two 3 foot jumper cables, and, two 50 RG-58 coax with BNC.
Installation
 When mounting an antenna outside make sure your clear of any power lines, and never install antenna by yourself. Try to find the best route for the coax cable, make sure you measure the route and only allow a little extra. Rule of thumb, higher the antenna the shorter the coax is always the best.
We had to get a 2’ wall mount bracket two clear the roof overhang. Once the bracket was secured to the side of the house we then installed the antenna to the post using U-bolt brackets. After drilling 1 inch hole into the side of the house we ran the LMR-400 Coax into the 4 port multi coupler in my hobby room. In my hobby room I have Uniden BCD996T and the classic Uniden BC780XLT, hook up both scanner to the multi coupler via the 3’ foot jumpers. The remaining two ports were used for scanners in the living room and master bedroom connected via the two 50’ RG-58 Coax cable.
Reception Test
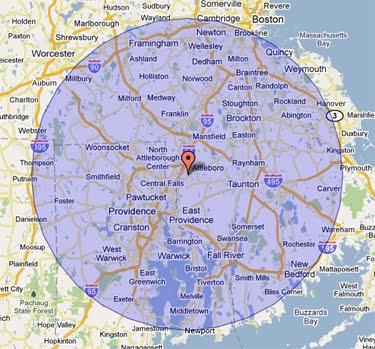 In Massachusetts and Rhode Island, most of the public safety is using VHF High Band or UHF. I was amazed by the reception. I was able to pick up UHF systems for 15 to 30 miles away without a problem, and as for the VHF, about 30+ miles away. In Massachusetts, the State Police are on an analog 800MHz trunking system. I was able to pick up the local site with ease and neighboring sites up to 20 miles away. I found that the height of the Ferret really brings in the VHF Low Band without a problem.
If you’re a Railroad buff like me, this is the antenna for you. Being in Attleboro along the Amtrak’s Northeast Corridor there is a lot of active on AAR Channel 54 160.9200 Mhz. With this antenna I’m able hear more of the communications between the dispatch and train, since most railroad systems are line of sight without a repeater a great antenna is key.
Overall
With almost 20 years of experience, I have to say this is one of the best roof top antennas I have ever used. If you decide on the Austin Ferret, make sure you get high quality coax cable like the LMR-400. The coax cable is just as important as the antenna to get the ultimate performance.
 Details about the Ferret…
All band omnidirectional antenna covering the following bands – 30-50/88-108/121/146/150-174/225-400/806-896/1.2 Ghz. The Ferret is in-case in 8 foot fiberglass tube protecting all of the elements for the eight bands
Recommend Coax for the Austin Ferret:
The LMR-400 is the best coax on the market for roof top antenna installations
LMR-400 Coax Cable, 25′, N Male to BNC Male
LMR-400 Coax Cable, 50′, N Male to BNC Male
LMR-400 Coax Cable, 75′, N Male to BNC Male
LMR-400 Coax Cable, 100′, N Male to BNC Male
Austin Antenna, a locally based company right here in New England, has been in business for the last 25 years. We carry the full Austin Antenna scanner product line; the Ferret, the Condor and the Spectra.
 By Jonathan Higgins
 Product Specs: