Scanner 101 – Cloning Uniden XT Scanners

Have you ever wanted to clone your programming from Uniden BCD996XT to another Uniden BCD996XT?

Here are the models you can clone:***

  • BCT15X
  • BC346XT
  • BCD396XT
  • BCD996XT

    ***Note: You can ONLY clone from the same model to another of the same (like BCT15X to BCT15X or BC346XT to BC346XT and so on).

    Here is how you do it….

    Directions how to clone BCD996XT or BCT15X:

    Parts needed:
    1 Uniden 4′ Serial Cable (comes with your scanner in the box)
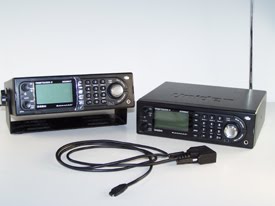
    Master Scanner:
    This is the scanner that has the programming that needs to be sent to the Slave.

    Slave Scanner:
    This is the scanner that needs the programming.

    Master Scanner
    Step 1 – First plug in the Uniden 4′ Serial Cable 9pin serial jack into the rear panel
    On the Master Scanner
    Step 2 – Press “Menu”
    Step 3 – Scroll and select to “Wired Clone”
    Step 4 – Select “Master”
    Step 5 – Select “Rear Port”

    Slave Scanner
    Step 6 -Plug the mini jack into the front of the scanner.
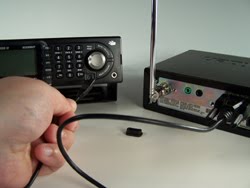
    On the Slave Scanner
    Step 7 – Press “Menu”
    Step 8 – Scroll and select to “Wired Clone”
    Step 9 – Select “Slave”
    Step 10 – Select “Front Port”

    Last steps…
    Step 11 – Hit Scan on Slave Scanner
    Step 12 – Hit Scan on Master Scanner

    ———————————————————————–

    Directions how to clone BC346XT or BCD396XT:

    Parts needed:
    >> 2 Uniden 4′ Serial Cable (comes with your scanners in the box)
    >> Null Modem
    >> Gender Changer
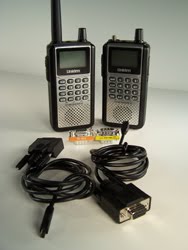
    Follow the steps below on how to make the cloning cable:

    Step 1 – Connect Uniden 4′ Serial Cable 9pin serial cable to Null Modem
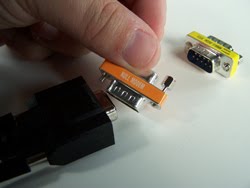
    Step 2 – Connect the Null Modem to Gender Changer
    Step 3 – then connect the second 9pin serial cable to the Gender Changer, and your clone cable is made.
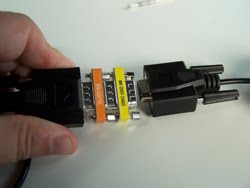
    Master Scanner:
    This is the scanner that has the programming that needs to be sent to the Slave

    Slave Scanner:
    Is the scanner that needs the programming

    Slave Scanner
    Step 4 – Plug the mini jack into the right side of the scanner.
    One the Slave Scanner
    Step 5 – Press “Menu”
    Step 6 – Scroll and select to “Wired Clone”
    Step 7 – Select “Slave”

    Master Scanner
    Step 8 – Then plug the mini jack into the front panel
    Step 9 – Press “Menu”
    Step 10 – Scroll and select to “Wired Clone”
    Step 11 – Select “Master”

    Last steps…
    Step 12 – Hit Scan on Slave Scanner
    Step 13 – Hit Scan on Master Scanner

  • Scanner Master Road Trip – Hopkinton, MA

    By Greg Jolly
    Road Trip to Hopkinton, MA

    On Friday April 16th the Scanner Master crew, Rich, Jonathan and myself, traveled to the center of Hopkinton, MA and the start of the Boston Marathon. Our purpose for this visit was to install a very custom programming job into a Uniden BCD996XT that was located in the new State of Massachusetts 911 Telecommunications Mobile Command Center.

    The custom programming job, created by Scanner Master, will allow the operators of this communications vehicle to monitor the public safety agencies of any of the 351 cities and towns within Massachusetts along with a variety of statewide agencies.

    The telecommunications vehicle will allow for backup operation of existing 911centers and major event communications. We were able to witness the newest state of the art technology in communications while there, as the vehicle has just been placed into service.

    This programming job provided another successful partnership between Scanner Master Corp. and the public safety community, of which we are very proud.

    The Uniden BCD996XT inside the Massachusetts 911 Telecommunications Mobile Command Center

    New ProductGRE PSR-200U Scanner

    By Jonathan Higgins
    GRE PSR-200U Scanner

    The GRE PSR-200/U scanner reminds me of my very first scanner the Radio Shack Realistic PRO-2014. GRE PSR-200U is replacing the GRE PSR-200.

    What new with the GRE PSR-200U Scanner:
    >> Adding the Broadcast FM Band – 87.3 – 107.9
    >> Capability to program/decode the private line (CTCSS/DCS)
    >> Signal Meter

    Everything else is still the same. I have to say I like the added feature of CTCSS/DCS. This will help with blocking unwanted distance communications on the same given frequency. Also the Signal Meter is very nice too!

    Also…
    >> Desktop Design
    >> 200 Channels
    >> SAME Weather Alert
    >> 5 Service Searches
    >> Skywarn
    >> PC Programmable
    >> Backlight LCD Display
    >> Easy to use Buttons

    Frequency Coverage:
    29-30MHz: 10 Meter Amateur Radio
    30-50MHz: VHF Low
    50-54MHz: 6 Meter Amateur Radio
    87.3-107.9MHz: FM Broadcast Band
    108-136.99166MHz: Aircraft
    137-144MHz: Government
    144-148MHz: 2 Meter Amateur Radio
    148-174MHz: VHF Hi
    380-450MHz: Amateur Radio/Government
    450-470MHz: UHF Standard
    470-512MHz: UHF “T”

    Included in the box:
    >> PSR-200U Scanner
    >> Telescope Antenna
    >> AC Adapter
    >> User Manual

    Great gift for someone that in a non-digital/trunking area…
    You should keep the GRE PSR 200U Scanner in mind, this entry-level 200 channel scanner is very simple to operate. Program single frequency in a few simple steps, it that easy!

    For some people this scanner will not work due to the radio systems in their area. How check if this scanner will work in their area? Visit our sister website http://www.policescanners.com.

    GRE PSR-200U – Key Pad

    GRE PSR-200U – Back of scanner Jacks