GPS Based Scanning Tips

Several Uniden scanners support GPS based scanning. There are two main ways this works; Database based and Programming Based.

Scanners that support ZIP Code based programming (The HomePatrol and x36 types) can support GPS in both ways. Scanners that do not have the ZIP Code feature only support Programming based GPS.

ZIP Code based GPS scanning allows the radio to reload itself with the local frequencies based on locations provided by the attached GPS receiver. Instead of pulling over to change the ZIP code every once in awhile the GPS receiver sends the location to the scanner and it will update the location on a regular basis and reload the channels for that area.

Since these use the RadioReference database to provide the information, the GPS centers and ranges are set in the database and included when you update the scanner’s database in Sentinel.

Programming based GPS scanning requires that the Systems, Sites and Groups (or Favorites Lists) be programmed with GPS coordinates and ranges. The GPS sends the location to the radio and when the radio determines that you are within the circle drawn based on the location and range it turns on that item. When you leave the circle it turns it off.

If you use your scanner over a wide area a GPS can allow you to automatically turn on and off systems, sites, groups and/or Favorites Lists automatically and without having to punch in a ZIP Code all the time. If you only use the scanner at home or around a small area a GPS wouldn’t help you but if you travel a lot (RV folk, truckers etc.) it can be invaluable.

Most people use the Uniden GPS receiver with their scanners. It works on all Bearcat GPS-aware scanners without needing to configure it. If you want to use another GPS it has to support the older Serial format and the baud rate settings must be set to match that of the scanner. Most GPS receivers these days (Garmin, TomTom etc.) do not support Serial mode so you will likely be better off with the Uniden GPS.

Scanners that support GPS Scanning:

How to connect the Uniden Bearcat GPS Receiver to the Uniden Bearcat BCD325P2 and the SDS100 Scanner with the optional cable.

Uniden Location Based scanner hints

Uniden’s line of Location Based scanners allow one to enter their location (usually by ZIP Code) to load local channels without needing to know frequencies, systems, talkgroups and other technobabble. There are a couple things to remember and a couple byproducts that can make life your scanner easier. These scanners include the HomePatrol 1 & 2, as well as the BCD436HP and BCD536HP.

First the good stuff! Did you know that you do not need the scanner itself to do most updates, including firmware? That’s right! If the radio is mounted in the car (especially for the BCD536HP) just remove the memory card and connect it to your computer using a card reader. Since these are “Mini SD-Cards” you will need a card reader that will read them or one that works with standard SD Cards and a Mini SD-Card adapter. Just plug the SD card into the card reader and then the reader into the computer and run Sentinel just like you would if the radio was plugged in. (When doing the Extreme, DMR or ProVoice Updates you must do them on the radio itself as the code is installed from the keypad.)

SD Card readers are inexpensive and some computers have SD-Card readers built in. Remember that the Mini SD-Card requires the Full-Size adapter since most computer slots and card readers do not accommodate the Mini SD-Card directly. While Uniden doesn’t supply the adapter card with the radios they are easy to find and come with Mini SD-Cards you buy in the store. This leads us to the next part:

Get a spare card!

Why have just one SD-Card for your scanner when you can have several? SD-Cards are cheap these days. You can buy spare or replacement cards anywhere (including ScannerMaster) and keep them in case you have difficulties. One problem with SD-Card based scanners is that the cards can be corrupted if the power is removed while the radio is on. Since the radio has to write some closing data to the card, one must turn the radio off before removing power or the batteries. Sometimes a voltage spike could cause this as well.

With a spare programmed SD-Card you can be ready if you have a problem. I have found that having a spare seems to prevent the need for it; the only time I corrupted a card was when I was on the road with no computer. I have since always carried a programmed spare card and never had a corruption issue. Coincidence? I think not!

Update your radio.

Using a card-reader to update the SD-Card in your Uniden Location Based scanner is simple, you can update the firmware, database and Favorites Lists directly on the card itself, plug the card in and the radio will automatically be updated. When you do this the radio’s firmware will be updated the first time you power the radio up with the new or reprogrammed card. The database and any enabled favorites lists will then load.

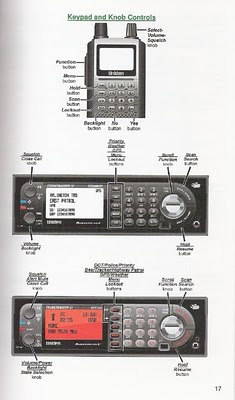
On the 536 you can just pop the card in and out from the front panel. Be sure to turn the radio off first! On HomePatrol and 436 radios the card is behind the batteries, so to access it remove the batteries, On the 436 slide the small metal retaining clip over and remove the card. To replace the card slide it into the clip, fold it down and slide the clip over again. On the HomePatrol the care pops in a slot, gently press it in a tiny bit to release it. When replacing the card carefully pop it into the slot until it clicks in.

Buy a new card from ScannerMaster!

When we do our Setup and Optimize on a scanner most customers would send the radio in to us, we do the updates etc. and then ship the radio back to the customer. We soon figured out that it would be easier and cheaper for the customer to buy a replacement card, have the card programmed and delivered. This way an expensive radio isn’t being shipped across the country twice, risking damage or loss. You get a new SD-Card, of a type faster and more reliable than that supplied with the radio. If your old card still works then you already have a spare. You save up to 10 days of transit time, don’t have to pay expensive shipping fees. Mailing an SD-Card costs less than $2.00, shipping a radio costs $15-25 each way. We also include the Full-Size adapter!

You can also create SD-Cards yourself with Sentinel. Remember that you need to use the “Clear User Data” menu item on a new card to format it for use on your Uniden radio.

Whistler SD-Card based scanners can be updated to a lesser extent, the DSP and firmware updates must be done thru the radio itself. The mobile Whistler scanners (WS-1095, WS-1098 and TRX-2) come with a full-size SD Card, the portable Whistler scanners use Mini SD Cards. Mini SD-Cards can be used in the mobile radios with the full-size adapter.

New Product – Easier to Read Uniden XT Scanner Manual


The Product: Easier to Read Uniden XT Scanner Manual
Price: $29.95
For: Uniden Bearcat’s BCT15X, BC346XT, BCD396XT, BCD996XT

Painstakingly created by Marksscanners, this 100 page Easier to Read Scanner Manual takes you deep into the amazing feature set and instructions for the Uniden XT scanners:

  • BCT15X
  • BC346XT
  • BCD396XT
  • BCD996XT

    This is an extremely handy 5.5 X 8.5 perfect-bound book which you can use on your desk, in your car and on the go. The guide is in 4-color with charts, images and super detailed text. This one guide covers all four of these latest Bearcat® XT model scanners and takes you far beyond what you get with the radio (only a CD-ROM and without the detail of Mark’s guide). Go step-by-step through each of the hundreds of features of these scanners and learn what the functions do and how they are enabled and disabled.

    Mark takes you through the process of planning systems, sites and groups and then programming your scanner with this information. The Uniden XT scanners are remarkable radios but to get the most out of them you really need this ultimate manual we are proud to offer.

    Example Pages:

  • Scanner 101 – Uniden RH-96 Remote Head Hook Up


    The Uniden BC-RH96 Remote Head is
    only available from Scanner Master!

    Using the Uniden BC-RH96 Remote Head
    Are you installing a new Uniden base/mobile Scanner in your car or truck? Most new vehicles don’t have a lot of space for a bulky full size scanner, so the Uniden BC-RH96 Remote Head is the perfect fix to any instillation. With the Remote head you can place the scanner under the seat or mount it in the trunk. With the compact BC-RH96 Remote Head you can have full control** of the scanner with full display taking up 75% less space. If you’re installing the BCT15X or BCD996XT in your vehicle, make sure you check out the Uniden Bearcat BC-RH96 Remote Head.

    **Note:
    When powering down the remote head, it will not power down the scanner itself.
    Size:
    7.2W x 1.9D x 2.2H in inches (without knobs)

    Also In the box:
    Mounting bracket with Knobs
    10 foot data cable
    Cigarette lighter DC power plug
    The Owner’s Manual
    The Uniden BC-RH96 Remote Head works with the following Uniden Scanners:
    BCD996XT / BCD996T
    BCD396XT / BCD396T
    BCT15X/BCT15
    BC346XT
    BR330T

    Bring the Sound the Front
    When purchasing the Uniden BC-RH96 please check out our external speaker options available. You also need to bring the sound to the front along with the controls. The BC-RH96 does not have an internal speaker.
    Uniden 4” External Speaker – 10 foot cord
    RoadPro 2.75” External Speaker – 6 foot cord

    Simple 1,2,3 Remote head to Scanner Hook-Up
    Step 1
    Hook up the data cable to the scanner via the front PC Port.
    Step 2
    Hook up the data cable to the RH96 to the Remote port. This cable can be extended by using an optional 6 foot stereo extension cable or 25 foot stereo extension cable.
    Step 3
    Hook up your cigarette lighter power cord or using the optional Uniden Power Cable (it will plug directly into your fuse block).

    Installing Tips
    >> When placing the scanner in the trunk or under the seat make sure the scanner is in a location so will will not over heat. Try to avoid tight closed in spots.


    >> If you need to extended the 10 foot data cable that comes with the BC-RH96 you can purchase optional 6 foot stereo extension cable or 25 foot stereo extension cable. These cables can be use to extend the speaker cables as well.

    >> If your using multipliable cigarette lighter power cords you may want to purchase 12-Volt 3 Outlet Power Port Adapter.
    Programmable Function Buttons

    With the Uniden BC-RH96 you can program three function buttons.
    Options include:

  • Scan Key
  • Hold Key
  • Service Menu Shortcut
  • WX Scan Menu Shortcut
  • Goto Tone-out Standby Shortcut
  • Goto Close Call Only Mode Shortcut
  • and more!
    See the BC-RH96 Manual Pages 19- 21 for more details.

  • Optional Parts:

    External Speakers
    Uniden 4″ External Speaker
    Uniden 4″ Powered External Speaker
    Roadpro 2.75″ External Speaker

    Data and Speaker Extension Cables
    Stereo Extension Cable 6′
    Stereo Extension Cable 25′

    Power Options
    Uniden Power Cord (no cigarette adapter)
    Uniden Cigarette Lighter Charger Straight Cord – This already comes with RH96, if you need extra here is the part needed.

    Multi-port Mobile Outlet
    12-Volt 4 Outlet Platinum Series Power Port