Scanner 101 – Installing New Firmware for the BC125AT

Firmware Update
Download Firmware Update 1.02.05 (April 26, 2012)

This update makes the following changes:

  • Update the frequency steps in the VHF band to match the latest FCC Narrowbanding band plan.
  • Change the opening screen to include the current firmware version.
  • Apply a one-time routine to convert the memory image of existing channels to the new format required by the narrowbanding change.
  • Change how Marine channels are displayed during service search.
  • Fixed a bug that could cause scanning/reception to stop with certain combinations of Close Call and other features selected.

Directions using Internet Explorer and Windows7 as the operating system

Step 1
Download the Firmware loader for the BC125AT – Download here

Step 2
When download prompt pops up select “Open”
(this will take a few minutes to download)

Step 3
A window will pop up select BC_VUP_V3_00_01 folder

Step 4
Select Setup_BC_VUP.msi and then click run

Step 5
Click close on the Installation Complete window

Step 6
Open the Firmware loader in programs under Uniden , then BC_VUP3
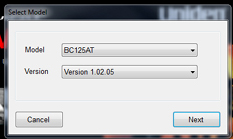
Step 7
When software opens a “Select Model” window should appear. As seen in the photo bellow.
Click Next
BC125AT-Soft001 Step 8
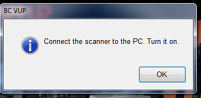
At this point you should have your Uniden BC125At turn on and connected to the PC via the data/power cable. Once this is done Click “OK” (Note: Uniden BC125AT drivers must be installed – Click here for directions)

BC125AT-Soft002
Step 9

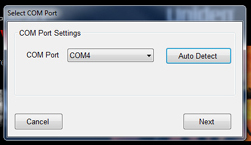
Click “Auto Detect”, when the comport is detected then click “Next”

BC125AT-Soft003 Step 10
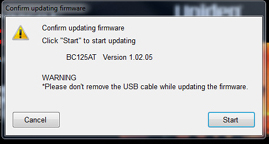
Click read and then click “Start”
BC125AT-Soft004Step 11
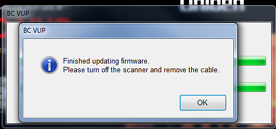
It will take about 3 minutes for the new firmware to be written to your BC125AT Scanner. Once you see the screen bellow your firmware update is complete.
BC125AT-Soft005


Scanner 101 – Installing PC Drivers Uniden BC125AT


Installing Drivers for the Uniden BC125AT

Step 1
Download the driver for your Uniden BC125AT
Click here to download

Step 2
Select Save as, then save the file to the desktop

Step 3
In your start menu, go to “Control Panel”

Step 4
In the Control Panel select “System”

Step 5
Select “Device Manager” (Top left)

Step 6
Plug in the Uniden BC125AT info the PC Via the USB Cable

Step 7 
“Other Devices” should pop up on the list as seen bellow.

Step 8
Right click on “BC125AT” and select “Update Driver Software”

Step 9
Select “Browse my computer for driver software”

Step 10
Click the “Browse” button and select “Desktop” and then hit “Next”

Step 11
You computer will find and install the drivers for the Uniden BC125AT Scanner.

Step 12
Take a look at your “Device Manager” window you will see the “BC125AT” listed under “Ports (COM & LPT)”  Once you see this you have successfully installed the drivers.

Scanner 101 – Tips on picking and installing a Roof Top Antenna

Have you been putting off installing a roof top antenna for your scanner? A roof top antenna is the best way to increase your scanner’s range.

What antenna should you pick?
When selecting you should keep the following in mind:
What type of communication systems are you monitor? VHF, UHF and 700/800/900MHz so on… If the area is using the same type of communication system you may want to consider a single band antenna. If there is a mix I would recommend “wide band” antenna.

Mounting your antenna
When selecting antenna you want to keep in mind; how and where you’re going to mount it. So many options available from non-penetrating, tripod, and wall mount. Keep way from power lines and telephone/cable wires. The higher the better, be sure you clearing anything that would block signals such as chimes.

Coax Cable
Your antenna performance depends on great coax cable! We carry LMR-400 Coax cable which is a high-end low signal loss coax. When planning out your coax routes, be sure you have a little extra, but not too much. Shorter runs are always best. Keep this in mind: the old carpenter rule of thumb, measure twice, cut once!

Will you have multiple listening locations?
Depending on how many listening locations you have in mind, you will need a 4 Port or 8 Port Multicoupler. This should be placed somewhere in a central location in your home or office. I would recommend running LMR-400 Coax cable (no more than 100 feet) from the antenna to the Multicoupler. From the Multicoupler to the scanners I would recommend LMR-400 or RG-6 Coax (no more than 50 feet). Both of the multicouplers have a built in pre-amp to cut down on signal loss going to the monitoring locations.

Installing the antenna
If your pretty handy this can be something you can do on your own, with help from a friend. Just following instructions provided with the antenna. If heights are not you thing I would recommend hiring help.

Scanner Master is your one stop shop for your entire base scanner antenna needs – from antennas to coax to mounting gear! Spring is here; don’t keep putting it off! Make 2012 the year to upgrade your scanner’s reception.

Quick Links:

Not sure?
Give us a call at Scanner Master 1-800-SCANNER we can help you!

Scanner 101 – Programming the Uniden Bearcat BC125AT Scanner

Product: Uniden Bearcat BC125AT Scanner

Scanner 101 Topic: Manually programming the BC125AT Scanner without software.

———-

Here are the steps to programming a conventional frequency into BC125AT

Step 1
Press Hold Button and Press the channel number you want to program then hit hold again.

Step 2
Press “Func” (Orange Button) then hit “Pgm E” button.

Step 3
“Enter Frequency” will be highlighted press “Pgm E” button.

Step 4
Press in the frequency you would like to program, then hit “Pgm E” button when you done.

Step 5
Select “Edit Tag” by scrolling the knob at the top of the scanner one click clockwise, then press “Pgm E” button.

Step 6
Using the knob at the top of the scanner scroll thru the letters and stop on the one you want then hit the “6 >” button to add the next letter. (repeat this step on until complete) Once your done with your Text Tag then hit the “Pgm E” button

Step 6
Select “Set CTCSS/DCS ” by scrolling the knob at the top of the scanner one click clockwise, then press “Pgm E” button.

Step 7
You can select from the following CTCSS/DCS options

  • Off
  • CTCSS
  • DCS
  • CTCSS/DCS Search

If the frequency has a CTCSS or DCS you can program it here or you can Search for it.

Step 8
The other options in the menu you wouldn’t need to worry about when programming. You can now hit scan to start scanning. To add more frequencies repeat Steps 1 – 7.
—–

Programming Software
Programming software is available from Uniden and from BuTel software. Uniden Software will be very basic vs. the BuTel Software will more advanced. With the BuTel Software you will have capability to import frequencies from RadioReference.com with a paid Membership.

Scanner 101 – HomePatrol-1 Extreme Trunking Discovery and Analysis


Paul Opitz, Senior Product Manager at Uniden continues his video series about the new HomePatrol-1 Extreme features:

Trunking Analysis

[youtube http://www.youtube.com/watch?v=s7ay-8aH6bE&w=350&h=350]

Trunking Discovery

[youtube http://www.youtube.com/watch?v=jHp2PJmiUEg&w=350&h=350]

Click here to see all past videos.

How do you get HomePatrol-1 Extreme, click here to read the details.

Scanner 101 – Understanding BuTel ARCXT Software

Last month Gommert Buysen, the owner and software developer of BuTel Software stopped in at our corporate headquarters in Holliston, MA. During his visit we shot two great videos about the ARCXT Software.

Products used in this Scanner 101:
ARCXT Basic
ARCXT PRO
Uniden USB Cable

The ARCXT Software works with the following Uniden scanners:
BCT15X
BC346XT
BCD396XT
BCD996XT

What are the differences between the ARCXT Basic and PRO?

Option
ARC-XT-BASIC
ARC-XT-PRO
Multi scanner support
Yes
Yes
Enhanced Editor for conv./trunk channels
Yes
Yes
Bandplan Editor
Yes
Yes
Multi Trunk site programming
Yes
Yes
Virtual Control
No
Yes
RadioRef Import
Yes
Yes
GPS US address lookup utility
Yes
Yes
Enhanced Virtual Control
No
Yes
Data logging/history
No
Yes
Bandscope
No
Yes
Waterfall Display
No
Yes
‘no loss’ Harddisk Audio Recording
No
Yes
Closecall/Subtone logging
No
Yes


Video 1 –
ARC-XT Scanner Radio Software Walkthrough

[youtube http://www.youtube.com/watch?v=Mchtwl4ugbM&w=400&h=350]

Video 2 –
ARC-XT PRO Scanner Radio Software Virtual Console Walkthrough

[youtube http://www.youtube.com/watch?v=FuoUJYVYk38&w=400&h=350]

Scanner 101 – Cloning Uniden XT Scanners

Have you ever wanted to clone your programming from Uniden BCD996XT to another Uniden BCD996XT?
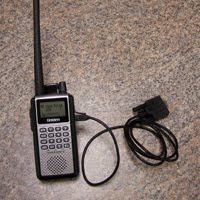
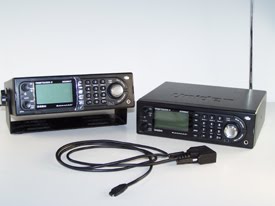
Here are the models you can clone:***

  • BCT15X
  • BC346XT
  • BCD396XT
  • BCD996XT

    ***Note: You can ONLY clone from the same model to another of the same (like BCT15X to BCT15X or BC346XT to BC346XT and so on).

    Here is how you do it….

    Directions how to clone BCD996XT or BCT15X:

    Parts needed:
    1 Uniden 4′ Serial Cable (comes with your scanner in the box)
    Master Scanner:
    This is the scanner that has the programming that needs to be sent to the Slave.

    Slave Scanner:
    This is the scanner that needs the programming.

    Master Scanner
    Step 1 – First plug in the Uniden 4′ Serial Cable 9pin serial jack into the rear panel
    On the Master Scanner
    Step 2 – Press “Menu”
    Step 3 – Scroll and select to “Wired Clone”
    Step 4 – Select “Master”
    Step 5 – Select “Rear Port”

    Slave Scanner
    Step 6 -Plug the mini jack into the front of the scanner.
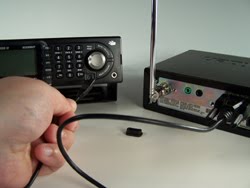
    On the Slave Scanner
    Step 7 – Press “Menu”
    Step 8 – Scroll and select to “Wired Clone”
    Step 9 – Select “Slave”
    Step 10 – Select “Front Port”

    Last steps…
    Step 11 – Hit Scan on Slave Scanner
    Step 12 – Hit Scan on Master Scanner

    ———————————————————————–

    Directions how to clone BC346XT or BCD396XT:

    Parts needed:
    >> 2 Uniden 4′ Serial Cable (comes with your scanners in the box)
    >> Null Modem
    >> Gender Changer
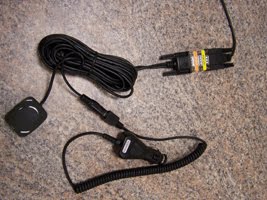
    Follow the steps below on how to make the cloning cable:

    Step 1 – Connect Uniden 4′ Serial Cable 9pin serial cable to Null Modem
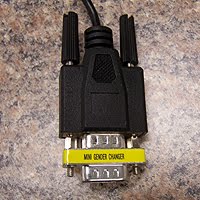
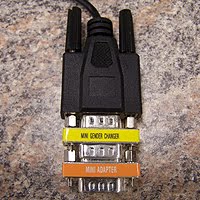
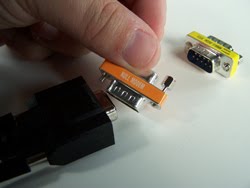
    Step 2 – Connect the Null Modem to Gender Changer
    Step 3 – then connect the second 9pin serial cable to the
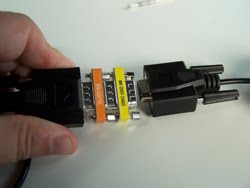
 Gender Changer, and your clone cable is made.
    Master Scanner:
    This is the scanner that has the programming that needs to be sent to the Slave

    Slave Scanner:
    Is the scanner that needs the programming

    Slave Scanner
    Step 4 – Plug the mini jack into the right side of the scanner.
    One the Slave Scanner
    Step 5 – Press “Menu”
    Step 6 – Scroll and select to “Wired Clone”
    Step 7 – Select “Slave”

    Master Scanner
    Step 8 – Then plug the mini jack into the front panel
    Step 9 – Press “Menu”
    Step 10 – Scroll and select to “Wired Clone”
    Step 11 – Select “Master”

    Last steps…
    Step 12 – Hit Scan on Slave Scanner
    Step 13 – Hit Scan on Master Scanner

  • Scanner 101 – Installing the GPS Receiver for Uniden BC346XT and BCD396XT

    What is GPS Scanning?
    Once you have the scanner programmed, this feature will allow for preset scanning, making it easier and safer for you to monitor a specific area while you’re driving. The scanner, along with the GPS Receiver, will turn on and off each programmed group as you travel. How is this done? The ARCXT software allows you to set up a center point’s latitude and longitude for each group. Let’s say your home town is in group one, you can find the center point by simply entering your zip code in the software. You can set the scanning range anywhere from 0.5 to 100+ mile(s). As you approach X mile(s) of that center point, the group will become unlocked. GPS Programming will also work with trunking systems. If you set up the trunking systems with multiple sites, you can set up each site with a center point and range.

    Parts needed for this project:
    Scanner – BC346XT or BCD396XT
    Uniden 4’ Serial Cable (included in the scanner box)
    Mini Gender Changer
    Null Modem
    GPS Receiver

    Once you have these features follow the step-by-step instruction below:

    Step 1: Plug the “Uniden 4’ Serial Cable “mini plug” into the scanner

    Step 2: Plug the other end of the Serial cable into the “Mini Gender Changer”

    Step 3: Plug the Mini Gender Changer into the Null Modem

    Step 4: Plug the Null Modem into the Serial end on the GPS Receiver


    Step 5: Plug in the Cigarette Lighter on the GPS Receiver into a available DC power outlet in your car.

    Step 6: Place magnetic GPS Antenna on a flat surface on the trunk or vehicle’s roof.

    Step 7: Power up the scanner (It may take several minutes to process the GPS info in the scanner)

    Scanner 101 – “Search With Scan”

    One feature that I find fascinating, and is available on the following Uniden models, BC246T, BC346XT, BR330T, BCT15, BCD396XT and, BCD996T is the Search With Scan. With this feature, you can run a service search or custom search as your scanner is scanning. You can set up the search in one of your available systems.

    Most Uniden Scanners have the following Service Searches:

  • Public Safety
  • News
  • HAM radio
  • Marine
  • Railroad
  • Citizen Band
  • FRS/GMRS
  • Racing
  • Military Air

    You also have the option of making 10 your own custom searches

    I like monitoring railroad communications. On long road trips I turn on this feature, so my scanner will be searching all railroad frequencies, while it’s scanning whatever else I have programmed. (In the photo to the left is the Mass Coastal GP9u 2007 sitting in Taunton, MA,)

    Below is step by step instructions:
    Step 1 – Go into the menu
    Step 2 – Select “Search for”
    Step 3 – Select “Edit Service” or “Edit Custom”
    Step 4 – Select the search you want
    Step 5 – Select “Search with Scan”
    Step 6 – Select “Set Quick Key”
    Step 7 – Select a System quick you have available 1 – 99
    Step 8 – Select “Set Lockout”
    Step 9 – Select “Unlocked”
    Step 10 – Hit “Scan”

    Check out this feature and lets us know what you think.